Part 2 - Landing Page
Now that we have installed Django and set up our project, we can start creating our website. This section will be focused on learning the basics of Django, which will help us with the subsequent sections where XCG comes into play.
Creating a Django application
We will house the issue submissions functionality within a Django application (or app for short) called "issues". To create this app, run the command below inside the towncouncil folder containing the manage.py script:
- Unix/macOS
- Windows (PowerShell)
- Windows (CMD)
python3 manage.py startapp issues
py manage.py startapp issues
py manage.py startapp issues
This should create an application folder named issues within your towncouncil project folder, such that the project folder structure is as shown below:
towncouncil/
├── db.sqlite3
├── issues
│   ├── admin.py
│   ├── apps.py
│   ├── __init__.py
│   ├── migrations
│   │   └── __init__.py
│   ├── models.py
│   ├── tests.py
│   └── views.py
├── manage.py
└── towncouncil
    ├── asgi.py
    ├── __init__.py
    ├── settings.py
    ├── urls.py
    └── wsgi.py
Just like during project creation, the Python code files within the issues folder are standard Python modules for a Django app and hence automatically created when using manage.py.
A modern day interactive website typically consists of multiple sets of functionalities, each delivered through a group of web pages. For example, a banking website might enable users to check their transaction history, perform transfers to other banks, invest in financial instruments using special accounts and so on, with each functionality delivered through a mutually exclusive set of web pages.
In Django, these independent sets of functionalities (or "web applications") are each referred to as a Django application (or app for short). The Django project houses the entire website, but a project can house one or more apps, and each app is just a Python package that (if developed well) can potentially be reused across different projects.
For more information on Django applications, refer to the official Django documentation.
Once our app is created, we need to let Django know of its existence by "installing" it. To do this, open the file named settings.py in the inner towncouncil folder and add a line to the INSTALLED_APPS list as highlighted below:
INSTALLED_APPS = [
    'django.contrib.admin',
    'django.contrib.auth',
    'django.contrib.contenttypes',
    'django.contrib.sessions',
    'django.contrib.messages',
    'django.contrib.staticfiles',
    'issues',
]
settings.py fileThe settings.py file located within your inner project folder contains all the configuration for your Django project. Although we will be interacting with it quite frequently, an in-depth explanation of all the options is outside of this document's scope. For detailed information, refer to the official Django documentation.
Creating the landing page
With our project and app set up, the first page we will create is the landing page, which is the default page that a user sees when they visit our website. In Django, each web page is represented by a view, which is typically a Python function or class that receives a HTTP request sent from the user's browser, processes it, and returns a HTTP response to the user that gets rendered by their browser.
Creating a basic view
We will start by creating the simplest possible view for our landing page. Open the file issues/views.py and replace any existing code with the code below:
from django.http import HttpResponse


def index(request):
    return HttpResponse("Hello world, you are at the Issues index.")
The index view function returns an extremely basic HTTP response that displays the text "Hello world, you are at the Issues index". However, just defining the function by itself does not allow a user to view this index page yet - we need to add a URL path that points to this view function. To do that, create a file urls.py in the folder towncouncil/issues/ containing the code below:
from django.urls import path

from . import views


urlpatterns = [
    path("", views.index, name="index"),
]
The file towncouncil/issues/urls.py defines the URL configuration for the Issues app via a Python list named urlpatterns. The code above tells Django that if a user visits the root URL path for the Issues app (i.e. the path ""), the index view function in the views module (i.e. code in the views.py file) should be executed to return a HTTP response.
At this point, there is still one more step we need to complete before we can access our index view. While we have configured the URLs for the Issues app, the app is only one part of the entire towncouncil website. When a user visits a URL path for the towncouncil website, Django starts by looking at the project-level URL configuration, which is contained in towncouncil/towncouncil/urls.py (rather than the app-specific URL configuration in towncouncil/issues/urls.py). To "activate" the app's URL configuration, we need to include a reference to it in the project-level URL configuration. Replace any existing the code in towncouncil/towncouncil/urls.py with the code below:
from django.urls import include, path


urlpatterns = [
    path('', include('issues.urls')),
]
The include function allows the root URL configuration to reference other URL configurations. The code above tells Django that requests for any URL path in the website should be resolved using the URL configuration defined in towncouncil/issues/urls.py, effectively delegating URL resolution to the Issues app.
includeThe typical usage of include is to allow multiple apps to define their own URL configuration, while the project-level (aka "root") URL configuration is used to define a top-level URL segment for each app. For example, a banking website might want all pages related to transactions to be accessed via paths like /transactions/<page_name>, while all pages related to investments should be accessed via /investments/<page_name>. This can be achieved by using include in the root URL configuration as shown below:
from django.urls import include, path


urlpatterns = [
    path("transactions/", include("transactions.urls")),
    path("investments/", include("investments.urls")),
]
For a more in-depth look at Django's URL configuration and dispatching mechanisms, refer to the official Django documentation.
Now in your shell environment, change to the outer towncouncil folder again (the one with the manage.py script), start the development server (if you stopped it before this), and visit http://127.0.0.1:8000. You should see a white background with just the text "Hello world, you are at the Issues index.".
If you are having difficulties following the tutorial up to this point, the full source code and configuration files for the towncouncil project folder can be downloaded using this link. Replace the contents of your outer towncouncil folder (the one containing manage.py) with the extracted contents of the downloaded zip file.
Creating the full landing page
Of course, such a basic view is way too simple to be used as an actual landing page, but it does help us verify that the URL configuration is wired up correctly. To create a more professional looking landing page that contains useful information, we can use Django templates to define our landing page structure and content.
A Django template is essentially a HTML document defining the structure and static content of a web page, with special syntax to describe how dynamic content can be inserted. A Django view function can render a specific template, which means to generate the final static HTML page using the template. During the rendering process, view functions can also inject the template with dynamically generated data. For a more in-depth walk through on Django templates, refer to the official documentation.
Create a folder named templates under the issues folder and create a file named base.html in the templates folder with the content below:
{% load static %}
<!doctype html>
<html lang="en">
<head>
  <meta charset="utf-8">
  <meta name="viewport" content="width=device-width, initial-scale=1, shrink-to-fit=no">
  <link rel="stylesheet" href="https://cdn.jsdelivr.net/npm/@govtechsg/sgds/css/sgds.css" />
  <link rel="stylesheet" href="https://cdn.jsdelivr.net/npm/bootstrap-icons@1.9.1/font/bootstrap-icons.css">
  <script
    type="module"
    src="https://cdn.jsdelivr.net/npm/@govtechsg/sgds-web-component/Masthead/index.js">
  </script>
  <link href='https://designsystem.gov.sg/css/sgds.css' rel='stylesheet' type='text/css'/>
</head>
<body>
  <div style="background-color: #e8f4f4" class="overflow-auto">
    <!-- Masthead -->
    <sgds-masthead></sgds-masthead>

    <!--Main Nav Component-->
    <div class="container col-lg-9" style="padding: 0 0 2rem;">
      <div class="row">
        <nav class="col-lg-12 mt-4 sgds navbar navbar-expand-lg">
          <div class="container-fluid" style="padding: 0">
            <a class="navbar-brand" href="/">
              <img
                src="{% static 'logo.png' %}"
                alt="Home"
                height="100rem"
              />
            </a>
            <button
              class="navbar-toggler"
              type="button"
              data-bs-toggle="collapse"
              data-bs-target="#navbarNav"
              aria-controls="navbarNav"
              aria-expanded="false"
              aria-label="Toggle navigation"
            >
              <i class="bi bi-list"></i>
            </button>
          </div>
        </nav>
      </div>
    </div>

    <!--Content section-->
    {% block content %}
    {% endblock %}

    <!-- Footer component -->
    <footer class="sgds footer">
      <section class="footer-top">
        <div class="container-fluid">
          <div class="row footer-header">
            <div class="col col-lg-6">
              <div class="title">XCG Town Council Issue Submissions Website</div>
              <div class="description">
                This website is developed and maintained by the XCG Town Council. It allows users to submit any
                issues they find around their neighbourhood. Anyone can head over to the form to
                submit issues they encountered. The XCG Town Council responder team is then able to
                login to view and resolve submitted issues.
              </div>
            </div>
          </div>
          </div>
        </div>
      </section>
    </footer>
  </div>
  <script src="https://cdn.jsdelivr.net/npm/bootstrap@5.1.3/dist/js/bootstrap.bundle.min.js"
  crossorigin="anonymous"></script>
</body>
This template will act as the "parent" template for the landing page as well as any other pages in our website. If we look closely, it contains the HTML code for components that should be included across all pages, such as the "masthead" (line 18), the main navigation bar (lines 21-46), and the footer (lines 53-70). It also contains some special, non-HTML syntax in the form {% %}, which are called template tags. These are part of the Django templating language, and are generally used to add logic such as conditional statements to otherwise static HTML documents.
The tag to note here is the block tag (lines 49-50). When a "child" template extends base.html, they can specify this same tag along with the user-defined name ("content" in this case) in order to inject its own content at this location. This concept of "child" templates extending "parent" templates forms the core of Django's template inheritance system, which aims to reduce code duplication by promoting code reuse between similar but different templates.
Some of the components in this website leverages on pre-designed components from the Singapore Government Design System, or SGDS for short. The SGDS provides many useful components and patterns for building Government websites with a unified look and feel. You can check out their website here for more information on how to get started.
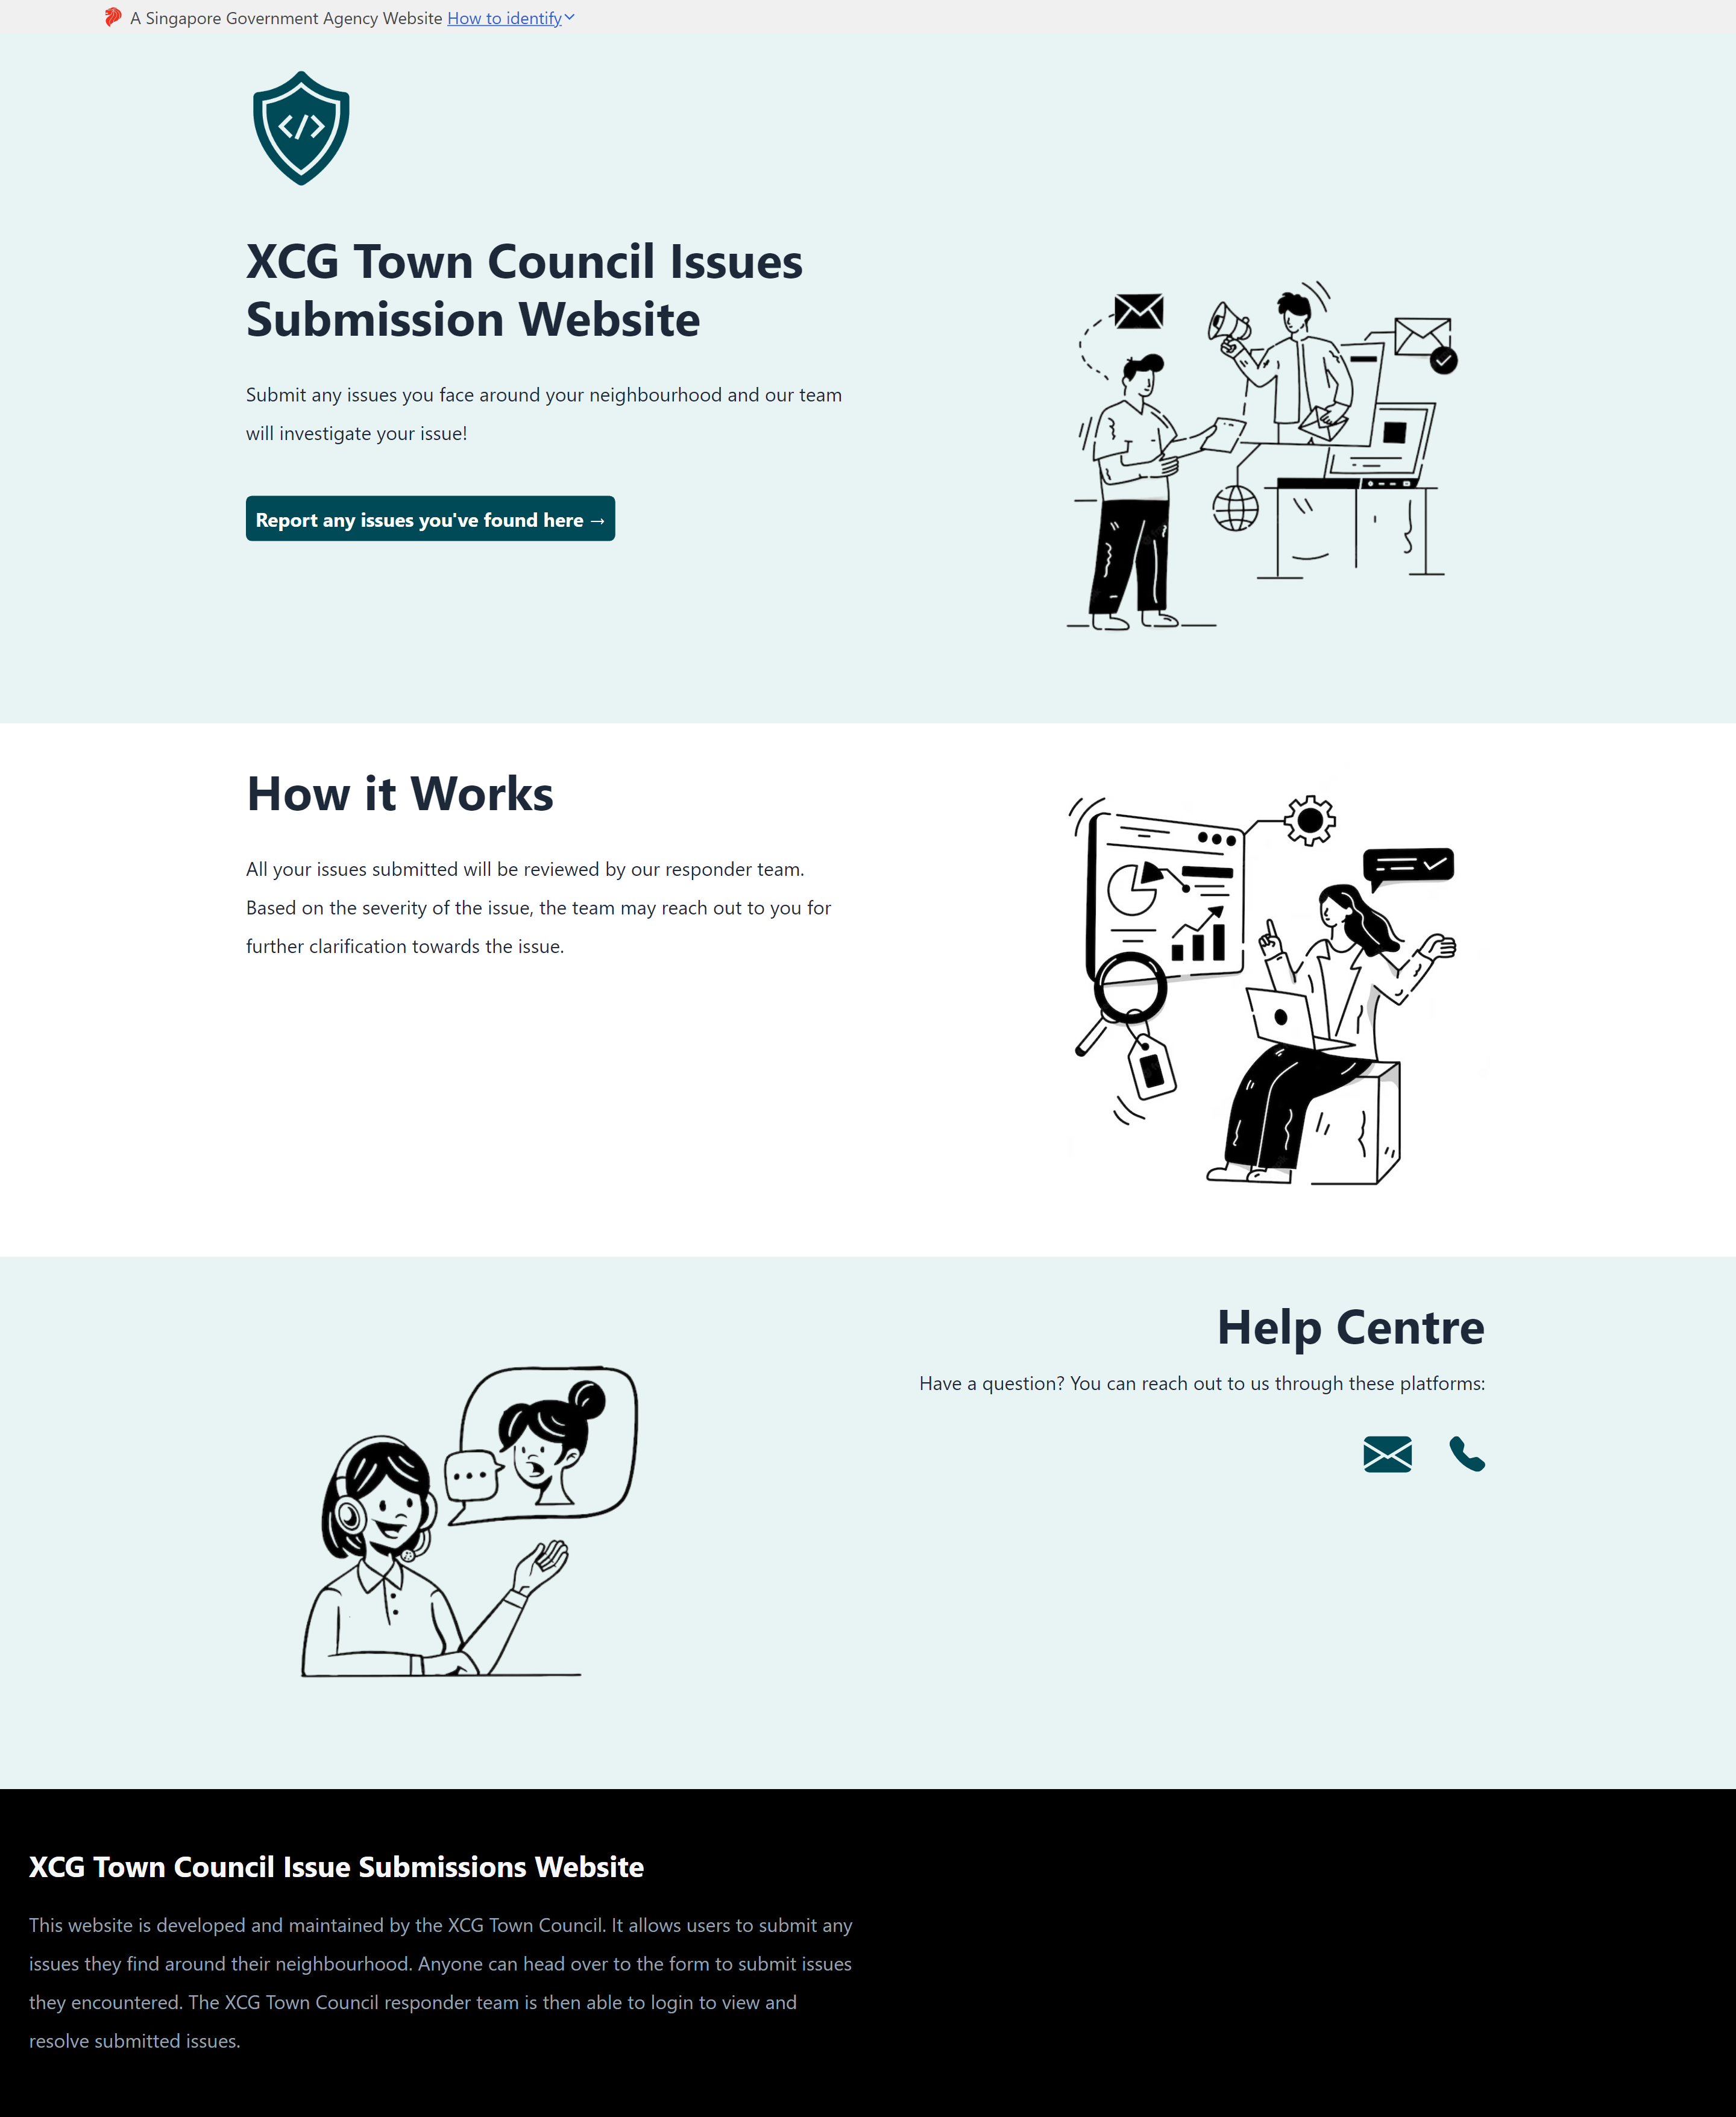
Having created this base template, we can now create our actual landing page template. Let's create a file named index.html inside the templates folder with the content below:
{% extends 'base.html' %}
{% block content %}
<div class="container col-md-12 col-lg-9" style="padding-bottom: 2rem">
<div class="row justify-content-center">
<div class="col-lg-6 col-md-12">
<h1 style="font-weight: bold;">XCG Town Council Issues Submission Website</h1>
<p style="padding: 1rem 0">Submit any issues you face around your neighbourhood and our team will investigate your issue!</p>
<a href="#" style="padding: 0.5rem; font-weight:bold; color: white; background: #004A57; border-radius: 5px; text-align: center; text-decoration: none;">Report any issues you've found here →</a>
</div>
<div class="col-lg-6 col-md-12" style="text-align: right;">
{% load static %}<img src="{% static 'index1.jpg' %}" alt="Designed by Freepik" style="width: 75%;">
</div>
</div>
</div>
<div style="background-color: white; padding: 2rem 0">
<div class="container col-md-12 col-lg-9">
<div class="row justify-content-center">
<div class="col-lg-6 col-md-12">
<h1>How it Works</h1>
<p style="padding: 1rem 0">All your issues submitted will be reviewed by our responder team. Based on the severity of the issue, the team may reach out to you for further clarification towards the issue.</p>
</div>
<div class="col-lg-6 col-md-12" style="text-align: right;">
{% load static %}<img src="{% static 'index2.jpg' %}" alt="Designed by Freepik" style="width: 75%;">
</div>
</div>
</div>
</div>
<div style="padding: 2rem 0">
<div class="container col-md-12 col-lg-9">
<div class="row justify-content-center">
<div class="col-lg-6 col-md-12">
{% load static %}<img src="{% static 'index3.jpg' %}" alt="Designed by Freepik" width=75%>
</div>
<div class="col-lg-6 col-md-12" style="padding: 0 1rem; text-align: right;">
<h1 id="contactus">Help Centre</h1>
<p>Have a question? You can reach out to us through these platforms:</p>
<a href="mailto:xcgtowncouncil@xcg.com"><svg xmlns="http://www.w3.org/2000/svg" width="40" height="40" fill="#004A57" class="bi bi-envelope-fill" viewBox="0 0 16 16">
<path d="M.05 3.555A2 2 0 0 1 2 2h12a2 2 0 0 1 1.95 1.555L8 8.414.05 3.555ZM0 4.697v7.104l5.803-3.558L0 4.697ZM6.761 8.83l-6.57 4.027A2 2 0 0 0 2 14h12a2 2 0 0 0 1.808-1.144l-6.57-4.027L8 9.586l-1.239-.757Zm3.436-.586L16 11.801V4.697l-5.803 3.546Z"/>
</svg></a>
<a href="tel:12345678"><svg xmlns="http://www.w3.org/2000/svg" width="30" height="30" fill="#004A57" class="bi bi-telephone-fill" viewBox="0 0 16 16">
<path fill-rule="evenodd" d="M1.885.511a1.745 1.745 0 0 1 2.61.163L6.29 2.98c.329.423.445.974.315 1.494l-.547 2.19a.678.678 0 0 0 .178.643l2.457 2.457a.678.678 0 0 0 .644.178l2.189-.547a1.745 1.745 0 0 1 1.494.315l2.306 1.794c.829.645.905 1.87.163 2.611l-1.034 1.034c-.74.74-1.846 1.065-2.877.702a18.634 18.634 0 0 1-7.01-4.42 18.634 18.634 0 0 1-4.42-7.009c-.362-1.03-.037-2.137.703-2.877L1.885.511z"/>
</svg></a>
</div>
</div>
</div>
</div>
{% endblock %}
As can be seen, this landing page template no longer has to define the masthead and other common components. All it has to do is extend the base template (using the extends template tag in line 1) and override the "content" block with its own custom content.
Now that we have defined the landing page template, there are only two things left to do before we can view the new and improved page. First, because the base and landing page templates refer to some PNG image files, you will need to download and move them to the correct folder within your project. To do this, perform the steps below:
- Create a folder in
towncouncil/issues/namedstatic. - Download this zip file and unzip the contents.
- Copy the unzipped contents (should be 4 PNG files) into the
towncouncil/issues/static/folder.
Next, we need to edit our view function code to render the landing page template rather than return our custom response string. Replace all the existing code in towncouncil/issues/views.py with the following:
from django.shortcuts import render


def index(request):
    return render(request, template_name='index.html')
This uses Django's render function to search for the index.html template, render it as HTML (i.e. processing template tags etc), and then return it as a HTTP response. Once you are done, visit http://127.0.0.1:8000 in your browser. You should now see a much more professional looking landing page being returned:
Note that the "report issues" button currently does not work, since it is hardcoded to redirect a user to a dummy path. We will add the correct link later on in the tutorial, once we have created the issue submission view.
If you are having difficulties following the tutorial up to this point, the full source code and configuration files for the towncouncil project folder can be downloaded using this link. Replace the contents of your outer towncouncil folder (the one containing manage.py) with the extracted contents of the downloaded zip file.