Part 4 - Responding to Issues
At this point, we have an application that allows anyone to submit issues. However, there is no interface for viewing these submitted issues and responding to them. In this part of the tutorial, we will create views to list all issues and display details of individual issues. We will then build an authentication system and require "responders" to log in before they can view or modify issues. In the process, we will make use of 2 more XCG packages - Secure Model Primary Key ID and View Permissions - to secure our website against potential vulnerabilities.
Creating the issues list view
Let's start by creating a view that lists all the currently submitted issues. As mentioned in the introduction above, this view should eventually be available only to authenticated responders. However, for ease of development, we will leave it public for the moment and add authentication in one of the later sections.
First, let's create a template for the issues list view. Create a file named list_issues.html in the issues/templates/ folder and copy in the following code:
{% extends 'base.html' %}

{% block content %}
<div class="container col-lg-9">
  <div class="row justify-content-center">
    <div class="col-lg-6 col-md-12 mx-auto">
      <h1 style="font-weight: bold;">Issues List</h1>
      <p style="padding: 1rem 0">The following table displays the list of issues submitted by users.</p>
    </div>
    <div class="col-lg-6 col-md-12 mx-auto"></div>
  </div>
</div>
<div class="container col-md-12 col-lg-9" style="padding-bottom: 4rem">
  <div class="row justify-content-center">
    <div class="table-responsive-lg">
      <table class="table table-hover">
        <colgroup>
          <col span="1" style="width: 10%;">
          <col span="1" style="width: 10%;">
          <col span="1" style="width: 40%;">
          <col span="1" style="width: 30%;">
          <col span="1" style="width: 10%;">
       </colgroup>
        <thead>
          <tr>
            <th scope="col">ID</th>
            <th scope="col">Type</th>
            <th scope="col">Summary</th>
            <th scope="col">Date Submitted</th>
            <th scope="col">Status</th>
          </tr>
        </thead>
        <tbody>
          {% for issue in issues %}
          <tr>
            <th scope="row">{{ issue.id }}</th>
            <td>{{ issue.type }}</td>
            <td><a href="#">{{ issue.summary }}</a></td>
            <td>{{ issue.submit_date }}</td>
            <td>{{ issue.status }}</td>
          </tr>
          {% endfor %}
        </tbody>
      </table>
    </div>
  </div>
</div>
<style>
  td a {
    display: block;
    text-decoration: none;
    color: black;
  }
  th a {
    font-weight: normal;
    text-decoration: none;
    color: black;
  }

</style>
{% endblock %}
This template defines a table where each row represents an individual issue, and each column represents an issue attribute. Since the total number of submitted issues is dynamic (changes as more issues are submitted), we cannot statically predefine the number of rows in our table. To resolve this, we can use the for and endfor template tags (see the highlighted lines) to generate HTML table rows in a loop. Notice that the template expects an issues variable to be passed in when rendering, which should be an iterable data structure containing individual Issue objects. This variable will be passed in later by a view function using the render helper function.
Next, let's create the view function that will handle requests for this view and render the template. In the views.py file within the issues folder, append the code below to the end of the file:
from .models import Issue


def list_issues(request):
    issues = Issue.objects.all()
    return render(request, template_name="list_issues.html", context={"issues": issues})
The code above uses the Issue class to query the database for all issue records. This returns a QuerySet associated with the variable issues, which represents a collection of Issue objects. This QuerySet is then passed to the template by passing the issues variable to the render function.
Once your application's models are created, Django provides a database-abstraction API through your model classes that allows you to create, read, update, and delete database records. The example shown above is just one of many ways to perform database operations. For a more detailed guide, refer to the official Django documentation on making database queries.
Finally, we just need to add a URL path for this view in order to access it from our browser. Add the highlighted path below to the urls.py file in the issues folder:
from django.urls import path

from . import views


urlpatterns = [
    path("", views.index, name="index"),
    path("submit/", views.submit_issue, name="submit_issue"),
    path("thankyou/", views.thank_you, name="thank_you"),
    path("issues/", views.list_issues, name="list_issues"),
]
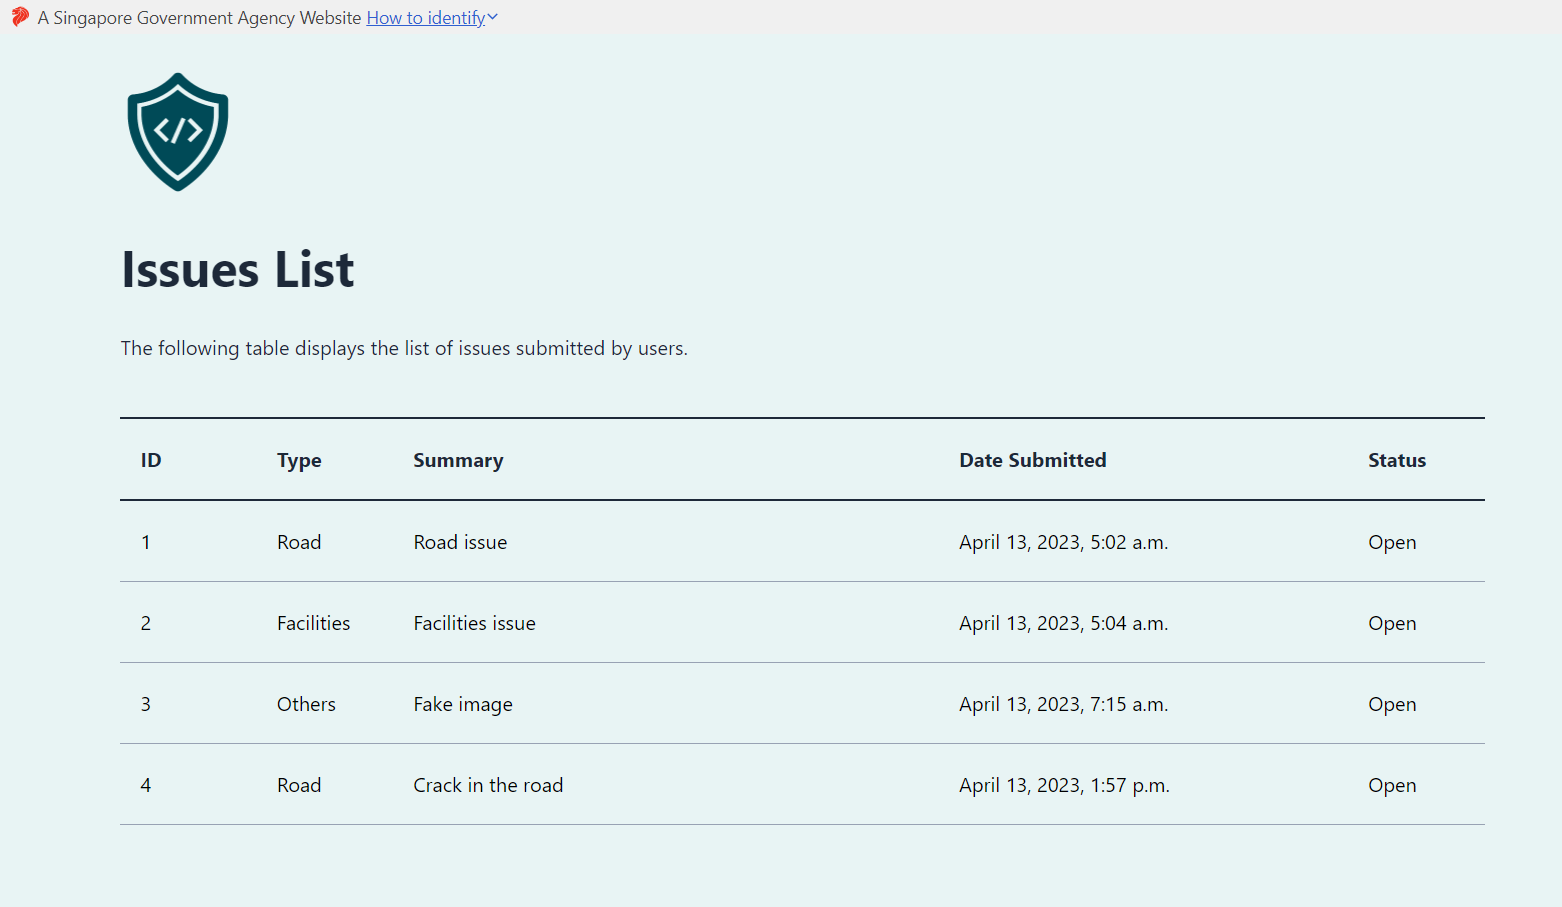
Now start the development server and visit the URL http://127.0.0.1:8000/issues/. You should see the created issues listed, similar to the screenshot below:
If you are having difficulties following the tutorial up to this point, the full source code and configuration files for the towncouncil project folder can be downloaded using this link. Replace the contents of your outer towncouncil folder (the one containing manage.py) with the extracted contents of the downloaded zip file.
Creating the issue details view
Now that we can view all the issues, the next step is to create a detailed view for a single issue. Again, let's start with the template. Create a file named display_issue.html in the issues/templates/ folder and copy in the code below:
{% extends 'base.html' %}

{% block content %}
<div class="container col-lg-9">
  <div class="row justify-content-center">
    <div class="col-lg-6 col-md-12 mx-auto">
      <h1 style="font-weight: bold;">Specific Issue</h1>
      <p style="padding: 1rem 0">Date Submitted: {{ issue.submit_date }}</p>
    </div>
    <div class="col-lg-6 col-md-12 mx-auto"></div>
  </div>
</div>
<div class="container col-lg-9" id="specificIssue">
  <div class="table-responsive-lg">
    <form method="post" enctype="multipart/form-data">
      {{ form.non_field_errors }}
      {% csrf_token %}
      <h1>Issue Information</h1>
      <table class="table table-bordered">
        <colgroup>
          <col span="1" style="width: 15%;">
          <col span="1" style="width: 85%;">
       </colgroup>
        <tbody>
          <tr>
            <td>Summary</td>
            <td>{{ issue.summary }}</td>
          </tr>
          <tr>
            <td>Description</td>
            <td>{{ issue.description }}</td>
          </tr>
          <tr>
            <td>Location</td>
            <td>{{ issue.location }}</td>
          </tr>
          <tr>
            <td>Evidence</td>
            <td>{% load static %}<a href="/{{ issue.evidence }}">{{ issue.evidence }}</a></td>
          </tr>
          <tr>
            <td>Type</td>
            <td>{{ issue.type }}</td>
          </tr>
        </tbody>
      </table>
      <h1>Issue Submitted By</h1>
      <table class="table table-bordered">
        <colgroup>
          <col span="1" style="width: 15%;">
          <col span="1" style="width: 85%;">
       </colgroup>
        <tbody>
          <tr>
            <td>First Name</td>
            <td>{{ issue.first_name }}</td>
          </tr>
          <tr>
            <td>Last Name</td>
            <td>{{ issue.last_name }}</td>
          </tr>
          <tr>
            <td>Email</td>
            <td>{{ issue.email }}</td>
          </tr>
          <tr>
            <td>Phone</td>
            <td>{{ issue.phone }}</td>
          </tr>
        </tbody>
      </table>
      <h1>Issue Status</h1>
      <table class="table table-bordered">
        <colgroup>
          <col span="1" style="width: 15%;">
          <col span="1" style="width: 85%;">
       </colgroup>
        <tbody>
          <tr>
            <td>Status</td>
            <td>
              <select name="issue_status" class="form-select form-control" id="issue_status">
                <option id="Open">Open</option>
                <option id="Pending">Pending</option>
                <option id="Resolved">Resolved</option>
              </select>
            </td>
          </tr>
        </tbody>
      </table>
      <div class="d-flex justify-content-end">
        <button type="submit" id="submit" class="btn btn-secondary sgds">Submit</button>
      </div>
    </form>
  </div>
</div>

<script>
  selectedOption = document.getElementById("{{ issue.status }}")
  selectedOption.setAttribute("selected", "")
</script>

<style>
  #specificIssue {
    background-color: white;
    padding: 2rem;
    border-radius: 10px;
    margin-bottom: 2rem;
  }
</style>
{% endblock %}
This will create a form containing read-only data for a specific issue. The only exception is the issue's status, which is editable so that a responder can modify it according to progress.
Next, let's create the view function. Append the code snippet below to the end of your views.py file in the issues folder:
from django.shortcuts import get_object_or_404


def display_issue(request, issue_id):
    issue = get_object_or_404(Issue, pk=issue_id)

    if request.method == "POST":
        new_status = request.POST.get("issue_status")
        if new_status != issue.status:
            Issue.objects.filter(pk=issue_id).update(status=new_status)
        return redirect("display_issue", issue_id=issue_id)
    else:
        return render(request, template_name="display_issue.html", context={"issue": issue})
There are 2 things to note about this view function:
- Unlike the other view functions so far, it requires an extra argument called
issue_idon top of the standardrequestobject. This will be captured and passed in using a special URL path which we will see later. - It handles HTTP POST requests just like the
submit_issueview function. This is because users are allowed to modify the issue's status, thereby introducing an element of data submission.
Next, we will wire this function up in our URL configuration by adding a URL path to issues/urls.py:
from django.urls import path

from . import views


urlpatterns = [
    path("", views.index, name="index"),
    path("submit/", views.submit_issue, name="submit_issue"),
    path("thankyou/", views.thank_you, name="thank_you"),
    path("issues/", views.list_issues, name="list_issues"),
    path("issues/<str:issue_id>", views.display_issue, name="display_issue"),
]
Notice something different about this path - it uses special syntax to capture the final path segment as a string with the name issue_id. This is the same issue_id that acts as the second argument to the display_issue view function that we just created above; The value here is captured and passed to the view function as an argument. This is a feature of Django's URL configuration mechanism which helps you use parts of the URL within your view functions without having to extract them yourself.
We can technically now browse to a specific issue's page by visiting the URL path /issues/<id>, but just to improve the user experience, let's add a hyperlink to each issue's row in the issues list view. Open issues/templates/list_issues.html and search for the line under the "Before" tab below (this should be line 38 if you copied the tutorial's code exactly). Change the value of href from "#" to "{% url 'display_isue' issue.id %}", as seen in the "After" tab.
- Before
- After
<td><a href="#">{{ issue.summary }}</a></td>
<td><a href="{% url 'display_issue' issue.id %}">{{ issue.summary }}</a></td>
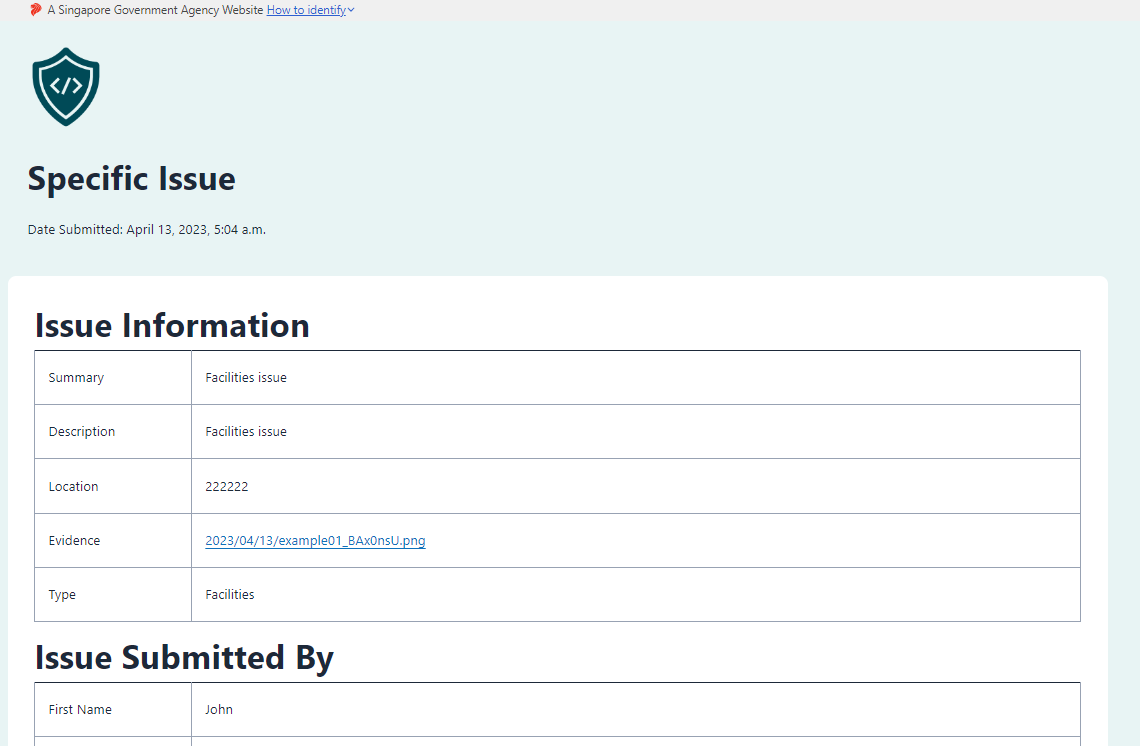
Now start the development browser and visit http://127.0.0.1:8000/issues/. You should be able to click on any issue's "summary" field to browse to that issue's individual details page, as shown in the screenshot below:
Preventing IDOR with securemodelpkid
You might have noticed by now that each Issue object has an id attribute despite us not having explicitly defined such an attribute in our model class. This is because Django's Model base class - which Issue is a subclass of - defines an id attribute transparently to us. The value of id for a model object maps to the primary key of a single database record. By default, Django models use an auto-incrementing integer value when assigning IDs, which means the first object for a particular model class gets ID 1, the second gets ID 2, and so on.
As IDs or primary keys are often used directly in user-controlled values like the URL path (e.g. our issue details view uses the path /issues/<id>), assigning easily guessable values like small positive integers can allow a malicious user to forcibly browse to pages they should not be able to see. Such a vulnerability is known as "Insecure Direct Object References" (IDOR).
IDOR is not necessarily a dangerous vulnerability on its own. For example, if an application is susceptible to IDOR, but has proper authentication and authorization mechanisms in place, the IDOR vulnerability may not lead to unauthorized information disclosure, since a malicious user will receive authorization errors when attempting to browse to other pages.
To mitigate any potential ill-effects of IDOR, we can incorporate the Secure Model Primary Key ID (securemodelpkid) package from XCG. This package provides a drop-in replacement for the Django Model base class that assigns randomly-generated, URL-safe strings as IDs instead of the default integers. This makes it practically impossible for a malicious user to guess or enumerate object IDs in our application.
To use securemodelpkid, we first have to install it using Pip:
- Unix/macOS
- Windows (PowerShell)
- Windows (CMD)
python3 -m pip install govtech-csg-xcg-securemodelpkid
py -m pip install govtech-csg-xcg-securemodelpkid
py -m pip install govtech-csg-xcg-securemodelpkid
Next, we replace the Django Model base class that Issue inherits from with the base class provided by securemodelpkid. Modify the code in issues/models.py according to the highlighted lines below:
from django.db import models
from django.utils import timezone
from django.core.validators import RegexValidator
from govtech_csg_xcg.securefileupload.validators import xcg_file_validator
from govtech_csg_xcg.securemodelpkid.model import RandomIDModel


class Issue(RandomIDModel):
    # Personal particulars of submitter
    first_name = models.CharField(max_length=100)
    last_name = models.CharField(max_length=100)
    email = models.EmailField(max_length=100)
    phone = models.CharField(max_length=8, validators=[RegexValidator(regex="[986][0-9]{7}")])

    # Information about the issue
    summary = models.TextField()
    description = models.TextField()
    location = models.TextField()
    evidence = models.FileField(upload_to="uploads/issues/%Y/%m/%d", validators=[xcg_file_validator])
    submit_date = models.DateTimeField("date submitted", default=timezone.now)
    type = models.CharField(
        max_length=10,
        choices=[
            ("Facilities", "Facilities"),
            ("Road", "Road"),
            ("Sewerage", "Sewerage"),
            ("Others", "Others"),
        ],
        default="Others"
    )
    status = models.CharField(
        max_length=8,
        choices=[
            ("Pending", "Pending"),
            ("Open", "Open"),
            ("Resolved", "Resolved")
        ],
        default="Open"
    )

    def __str__(self):
        return self.summary
Finally, to synchronize changes in our model to our database, we need to perform a database migration by running the following commands in our outer towncouncil folder (the one with manage.py):
- Unix/macOS
- Windows (PowerShell)
- Windows (CMD)
python3 manage.py makemigrations
python3 manage.py migrate
py manage.py makemigrations
py manage.py migrate
py manage.py makemigrations
py manage.py migrate
Now start the development server and submit a new issue, then visit the issues list page. You should see the newest issue having a randomly-generated string as its ID. Clicking into the issue details page should show the URL path as something like /issues/CGTjiFRMlQZsb2P864sSRPkguWKMHYPD.
You may have noticed that the existing issues retain their original integer IDs even after the database migration. This is expected, as the migration only changes the data type of the primary key without regenerating the values for existing records. If you want all your records to use random IDs generated by securemodelpkid, you will have to either delete the SQLite database (towncouncil/db.sqlite) and start over or write your own script to re-create the existing issues.
If you are having difficulties following the tutorial up to this point, the full source code and configuration files for the towncouncil project folder can be downloaded using this link. Replace the contents of your outer towncouncil folder (the one containing manage.py) with the extracted contents of the downloaded zip file.
Requiring authentication from responders
Now that the issues list and issue details views are both complete, we should protect them by restricting access to only authenticated responders. We will accomplish this in 2 parts:
- Incorporate the XCG View Permissions package to make all views private by default
- Create the login view to allow responders to log in
Making views private by default using viewpermissions
You may have noticed that all Django views are "public" by default. That is, without explicitly defining access controls for your views, anyone on the Internet will be able to access all your website's views by default.
While we can definitely implement proper access controls for the issues list and issue details views, taking an "allow by default, restrict specific views" approach can be dangerous in the long run, especially as the number of views increases. In a large and complicated production website, it's not too hard to imagine a view being unintentionally left "public", either due to negligence or other reasons.
The View Permissions XCG package helps to address this by taking a "block by default" approach. What this means is that when activated, View Permissions will deny access to all views unless they are explicitly marked as "public", or if they explicitly specify a condition that the user must meet (e.g. user must be authenticated). Let's see this in action for ourselves.
To start off, we need to install the View Permissions package:
- Unix/macOS
- Windows (PowerShell)
- Windows (CMD)
python3 -m pip install govtech-csg-xcg-viewpermissions
py -m pip install govtech-csg-xcg-viewpermissions
py -m pip install govtech-csg-xcg-viewpermissions
Next, we activate View Permissions by adding the viewpermissions app to our INSTALLED_APPS list in towncouncil/settings.py, as well as add the middleware to the MIDDLEWARE list:
INSTALLED_APPS = [
    'django.contrib.admin',
    'django.contrib.auth',
    'django.contrib.contenttypes',
    'django.contrib.sessions',
    'django.contrib.messages',
    'django.contrib.staticfiles',
    'issues',
    'govtech_csg_xcg.viewpermissions',
]

MIDDLEWARE = [
    'django.middleware.security.SecurityMiddleware',
    'django.contrib.sessions.middleware.SessionMiddleware',
    'django.middleware.common.CommonMiddleware',
    'django.middleware.csrf.CsrfViewMiddleware',
    'django.contrib.auth.middleware.AuthenticationMiddleware',
    'django.contrib.messages.middleware.MessageMiddleware',
    'django.middleware.clickjacking.XFrameOptionsMiddleware',
    'govtech_csg_xcg.securefileupload.middleware.FileUploadValidationMiddleware',
    'govtech_csg_xcg.viewpermissions.middleware.ViewPermissionsMiddleware',

]
Now start the development server and navigate to http://127.0.0.1:8000/. You should see a 404 "Page not found" error. If you look carefully, this is because you have been redirected to the URL path /accounts/login/?next=/, which isn't a path that exists within your URL configuration. This highlights the default behaviour of View Permissions, which is to redirect unauthenticated users to the Django default login URL when they try to access any view not explicitly declared to be public.
Of course, we don't want all our pages to be private; Our landing page, issue submission page, and thank you page should still be accessible to any user, whether authenticated or not. To achieve this, we can import and add the public decorator provided by View Permissions to these 3 views. Add the highlighted lines of code below to your views.py file in your issues folder:
from django.shortcuts import render
from govtech_csg_xcg.viewpermissions.decorators import public


@public
def index(request):
    return render(request, template_name='index.html')


from django.shortcuts import redirect
from django.http import HttpResponse
from govtech_csg_xcg.securefileupload.decorator import upload_config
from .forms import IssueForm


@public
@upload_config(whitelist_name="CUSTOM", whitelist=["image/png", "image/jpeg"], file_size_limit=3000)
def submit_issue(request):
    if request.method == "POST":
        form = IssueForm(request.POST, request.FILES)
        if form.is_valid():
            form.save()
            return redirect("thank_you")
    else:
        form = IssueForm()

    return render(request, template_name="submit_issue.html", context={"form": form})


@public
def thank_you(request):
    return render(request, template_name="thank_you.html")
Starting your development server again, verify that you can now access the landing page and the issue submission page. You should also be able to submit an issue and see the thank you page afterwards. Additionally, verify that you cannot access the issues list (/issues/) and issue details (/issues/<id>) pages.
Creating the login view
Now that we have restricted access to our views, let's create a login view for responders to authenticate themselves, and set the proper permissions on the issues list and issue details views so that logged in responders can access them.
To create the login view, we will start with a template as usual. Create a file named login_responder.html in the issues/templates/ folder and copy in the code below:
{% extends 'base.html' %}

{% block content %}
<div class="container col-lg-9">
  <div class="row justify-content-center">

    <div class="col-lg-6 col-md-12 mx-auto"></div>
  </div>
</div>
<div class="container col-lg-5 col-md-9">
  <section class="rounded p-5 my-8">
    {% if messages %}
      <div class="messages">
        {% for message in messages %}
        <div {% if message.tags %} class="{{ message.tags }}" {% endif %}>{{ message }}</div>
        {% endfor %}
      </div>
    {% endif %}
    <form method="post" enctype="multipart/form-data">
      {{ form.non_field_errors }}
      {% csrf_token %}
      <div>
        <div class="col-md-12 mx-auto">
          <h1 style="font-weight: bold; text-align: center; padding-bottom: 2rem;">Responder Login</h1>
        </div>
        <div class="mb-3">
          <label class="form-label" for="username">Username</label
            ><input
            type="text"
            id="username"
            name="username"
            class="form-control"
            required
          />
        </div>
        <div class="mb-3">
          <label class="form-label" for="password">Password</label
          ><input
          type="password"
          id="password"
          name="password"
          class="form-control"
          required
        />
        </div>
      </div>
      <div class="d-flex justify-content-end my-8">
        <button type="submit" class="btn btn-secondary sgds">Submit</button>
      </div>
    </form>
  </section>
</div>
{% endblock %}
Next, open the views.py file in the issues folder and append the code below to the end of the file:
from django.contrib import messages
from django.contrib.auth import authenticate, login


@public
def login_responder(request):
    if request.method == "POST":
        username = request.POST.get("username")
        password = request.POST.get("password")
        user = authenticate(username=username, password=password)

        if user is not None:
            login(request, user)
            return redirect("list_issues")
        else:
            messages.error(
                request,
                "Username or password is incorrect!",
                extra_tags="alert alert-danger alert-dismissible fade show",
            )

    return render(request, template_name="login_responder.html")
Notice that we apply the public decorator to the login_responder view function as well since the login view has to be public by definition. Instead of creating our own authentication logic, we leverage on Django's built-in authentication system by using helper functions from django.contrib.auth.
As before, we now wire up this function to our URL configuration by adding a URL path in issues/urls.py:
from django.urls import path

from . import views


urlpatterns = [
    path("", views.index, name="index"),
    path("submit/", views.submit_issue, name="submit_issue"),
    path("thankyou/", views.thank_you, name="thank_you"),
    path("issues/", views.list_issues, name="list_issues"),
    path("issues/<str:issue_id>", views.display_issue, name="display_issue"),
    path("login/", views.login_responder, name="login_responder"),
]
With that, we have created a fully functional login view. However, the View Permissions package will still prevent us from accessing the issues list and issue details views until we configure them with the proper permissions.
Assigning appropriate view permissions
As mentioned in the section above, the View Permissions package makes all views inaccessible by default, unless explicitly specified to be "public" or configured with the appropriate permissions. To provide access to the issues list and issue details views, we will configure them such that only logged in users have access.
In your views.py file within the issues folder, around the locality of the list_issues and display_issues view functions, add the highlighted lines of code below:
from .models import Issue
from django.contrib.auth.decorators import login_required


@login_required
def list_issues(request):
    issues = Issue.objects.all()
    return render(request, template_name="list_issues.html", context={"issues": issues})


from django.shortcuts import get_object_or_404


@login_required
def display_issue(request, issue_id):
    issue = get_object_or_404(Issue, pk=issue_id)

    if request.method == "POST":
        new_status = request.POST.get("issue_status")
        if new_status != issue.status:
            Issue.objects.filter(pk=issue_id).update(status=new_status)
        return redirect("display_issue", issue_id=issue_id)
    else:
        return render(request, template_name="display_issue.html", context={"issue": issue})
With this, View Permissions should allow a logged in user to access the views. To verify this, let's create a user to log in with. In the outer towncouncil folder (the one containing manage.py), run the command below and follow the subsequent instructions in order to create a "super user":
- Unix/macOS
- Windows (PowerShell)
- Windows (CMD)
python3 manage.py createsuperuser
py manage.py createsuperuser
py manage.py createsuperuser
Start the development server and visit http://127.0.0.1:8000/login/ in your browser. Sign in as the super user you just created; This should now allow you to view the issues list and issue details pages.
Allowing responders to log out
Now that our website allows responders to log in, we should also provide an option to log out. To accomplish this, let's create a simple log out view.
Since logging out is a predominantly back end action, we don't have to create a template for this view. Instead, open your issues/views.py file and append the code below to the end of the file:
from django.contrib.auth import logout


@login_required(login_url="/", redirect_field_name="")
def logout_responder(request):
    logout(request)
    return redirect("index")
This defines a simple view function for logging out, which will redirect a user to the landing page if successful. Add a URL path to access this view function:
from django.urls import path

from . import views


urlpatterns = [
    path("", views.index, name="index"),
    path("submit/", views.submit_issue, name="submit_issue"),
    path("thankyou/", views.thank_you, name="thank_you"),
    path("issues/", views.list_issues, name="list_issues"),
    path("issues/<str:issue_id>", views.display_issue, name="display_issue"),
    path("login/", views.login_responder, name="login_responder"),
    path("logout/", views.logout_responder, name="logout_responder"),
]
Miscellaneous improvements
Our website now has a fully functional authentication system. However, there are two small user-experience issues that should be quickly addressed.
First, there are no links to the login and logout views from any other page, which makes it cumbersome to perform those actions. We can solve this by adding a login button near the top right corner of every page, which will be replaced by a logout button if the user is authenticated. Let's also add a link to the issues list page if the user is authenticated as a responder. To implement these, replace the contents of your base HTML template with the code below:
{% load static %}
<!doctype html>
<html lang="en">
<head>
  <meta charset="utf-8">
  <meta name="viewport" content="width=device-width, initial-scale=1, shrink-to-fit=no">
  <link rel="stylesheet" href="https://cdn.jsdelivr.net/npm/@govtechsg/sgds/css/sgds.css" />
  <link rel="stylesheet" href="https://cdn.jsdelivr.net/npm/bootstrap-icons@1.9.1/font/bootstrap-icons.css">
  <script
    type="module"
    src="https://cdn.jsdelivr.net/npm/@govtechsg/sgds-web-component/Masthead/index.js">
  </script>
  <link href='https://designsystem.gov.sg/css/sgds.css' rel='stylesheet' type='text/css'/>
</head>
<body>
  <div style="background-color: #e8f4f4" class="overflow-auto">
    <!-- Masthead -->
    <sgds-masthead></sgds-masthead>

    <!--Main Nav Component-->
    <div class="container col-lg-9" style="padding: 0 0 2rem;">
      <div class="row">
        <nav class="col-lg-12 mt-4 sgds navbar navbar-expand-lg">
          <div class="container-fluid" style="padding: 0">
            <a class="navbar-brand" href="/">
              <img
                src="{% static 'logo.png' %}"
                alt="Home"
                height="100rem"
              />
            </a>
            <button
              class="navbar-toggler"
              type="button"
              data-bs-toggle="collapse"
              data-bs-target="#navbarNav"
              aria-controls="navbarNav"
              aria-expanded="false"
              aria-label="Toggle navigation"
            >
              <i class="bi bi-list"></i>
            </button>
            <div class="collapse navbar-collapse" id="navbarNav">
              {% if request.user.is_authenticated %}
              <ul class="navbar-nav mr-auto">
                <li class="nav-item">
                  <a class="nav-link" href="{% url 'list_issues' %}">All Issues</a>
                </li>
              </ul>
              {% endif %}
              <ul class="navbar-nav ms-auto">
                {% if request.user.is_authenticated %}
                <li class="nav-item">
                  <a class="nav-link" href="#" style="padding: 0.5rem; align-items: center; min-height: 100%;"><b>Welcome {{ request.user }}!</b></a>
                </li>
                <li class="nav-item">
                  <a class="nav-link" href="{% url 'logout_responder' %}" style="padding: 0.5rem; font-weight:bold; color: white; background: #004A57; border-radius: 5px">Logout</a>
                </li>
                {% else %}
                <li class="nav-item">
                  <a class="nav-link" href="{% url 'login_responder' %}" style="padding: 0.5rem; font-weight:bold; color: white; background: #004A57; border-radius: 5px">Responder Login</a>
                </li>
                {% endif %}
              </ul>
            </div>
          </div>
        </nav>
      </div>
    </div>

    <!--Content section-->
    {% block content %}
    {% endblock %}

    <!-- Footer component -->
    <footer class="sgds footer">
      <section class="footer-top">
        <div class="container-fluid">
          <div class="row footer-header">
            <div class="col col-lg-6">
              <div class="title">XCG Town Council Issue Submissions Website</div>
              <div class="description">
                This website is developed and maintained by the XCG Town Council. It allows users to submit any
                issues they find around their neighbourhood. Anyone can head over to the form to
                submit issues they encountered. The XCG Town Council responder team is then able to
                login to view and resolve submitted issues.
              </div>
            </div>
          </div>
          </div>
        </div>
      </section>
    </footer>
  </div>
  <script src="https://cdn.jsdelivr.net/npm/bootstrap@5.1.3/dist/js/bootstrap.bundle.min.js"
  crossorigin="anonymous"></script>
</body>
Second, the login URL configured for our project is still Django's default, which is /accounts/login/. This results in a 404 Not Found error page if an unauthenticated user tries to visit any page requiring authentication. We can set this to our own login URL by adding a LOGIN_URL variable to the end of our settings.py file:
LOGIN_URL = '/login/'
If you start the development server now and visit the issues list page without logging in, you should be redirected to the correct login page instead of receiving a 404 error.
If you are having difficulties following the tutorial up to this point, the full source code and configuration files for the towncouncil project folder can be downloaded using this link. Replace the contents of your outer towncouncil folder (the one containing manage.py) with the extracted contents of the downloaded zip file.